Sunday, May 24, 2015

Easy Strawberry Jam + The Best Waffles

Ahhh long weekends are like a breath of fresh air. It's amazing what one extra day off can make in the normal routine of your week! Surprisingly, Stuart and I are staying in town this weekend and just relaxing. Last week we were at an engagement party and next week we are visiting my grandma in Oakland, so it's nice to have some time to just stay put and focus on things that need to get done on the home front. 

Yesterday I dragged Stuart to the Arroyo Grande Strawberry Festival, which takes place in a cute little town about 20 minutes south of us. We missed it last year, and I was very much anticipating it and picturing a utopia of strawberry everything. While they did have amazing activities for kids (including camel riding - random but amazing) most of the booths turned out to be nothing special and was a bit more like what you would find at a typical fair or carnival with a bunch of random knick-knacks.


The bright side was that we came home with a whole half-flat (six baskets) of perfectly ripe strawberries grown right in Arroyo Grade. They looked and smelled fantastic, and from the tastes I stole from the box as we were walking back to the car, it was well worth the $10 spent for local berries at the height of the season. And I had big plans for those berries, believe me. Ages ago I jotted down a recipe for "quick strawberry jam," containing just a few easy ingredients. You'll want to consume it within a few weeks as it has no preservatives, but I can't wait to spoon it on everything from yogurt to ice cream to pancakes.

My jam turned out almost like a strawberry sauce rather than a jam (cooking longer would have done the trick) but once I had my beautiful mason jars full of sauce I couldn't wait to pout it all over some hot fresh WAFFLES. My dad has the best recipe in the world for waffles, and I've just been dying for the right time to share this "family secret" with you all. So here we go: easy strawberry jam + the best waffles...


Strawberry Jam

Ingredients:
2 baskets ripe strawberries, washed, hulled, and halved
¼ cup honey
¼  cup sugar (add up to 1/2 cup total if your strawberries seem tart)
2 Tablespoons fresh lemon juice

Directions:
Mix all ingredients in a heavy medium pot. Bring to a boil and skim off any foam. Reduce heat and cook over medium, mashing the berries slightly with a wooden spoon or fork, for about 30-40 minutes. You may need more or less time to reach the desired jam consistency. Let cool a bit, pour into a medium-size mason jar, and refrigerate until needed. Consume within approximately 2-3 weeks.

The Best Waffles

Preheat waffle iron of your choice.

Mix together in a medium bowl:
1 ¾ cups flour
1 teaspoon baking powder
1 tablespoon sugar
½ teaspoon salt

Whisk together in another bowl:
3 large eggs, well beaten
1 stick unsalted butter, melted (all the way melted, not just softened)
1 ½ cups milk

Make a well in the center of the dry ingredients and pour in the wet ingredients. Gently whisk them together with a few swift strokes. The batter should have a pebbled look, similar to muffin batter. If you wish, fold in optional toppings such as berries, banana, chopped nuts, chocolate chips, or coconut flakes.

Spoon approximately ½ cup of batter (or amount recommended by your waffle maker) onto the hot iron. Spread the batter to within ¼ inch of the edge of the grids. Bake until golden brown.

Tuesday, May 19, 2015

Goshi Japanese Restaurant

I have a confession to make... I don't like sushi. I know, I know, that is pretty unbelievable. I guess everyone has that one culinary "thing" they just can't bring themselves to enjoy eating, and for me that has always been raw fish and shellfish. That is correct - no crab, lobster, shrimp, clams, scallops, or raw sushi goes into my mouth. Something about the texture just does not work for me. My family members always tease me that I just won't eat anything with an exoskeleton!


However, just because I don't like sushi doesn't mean I don't enjoy Japanese food. When I was younger, chicken teriyaki was my jam. These days, I am always on the lookout for creative cooked sushi rolls, veggie rolls, tempura, or other tasty dishes that allow me to enjoy the amazing flavors of Japanese food when I go with a group of friends or family. In San Luis Obispo, we are lucky to be close to the coast so fresh seafood ingredients are possible to come by.

Our absolute favorite Japanese spot in town is Goshi Japanese Restaurant, and other spots we've been to in the area simply pale in comparison. They have a wonderful selection and are always packed. Since they don't take reservations, we usually end up putting our name in and walking around for 30 minutes or so while we wait for a table to open. Stuart swears the raw sashimi and nigiri options are to die for, and I've even found two cooked rolls that suit my picky dietary specifications.

What are your thoughts on sushi? Are there any foods you simply won't eat?


Sunday, May 10, 2015

Homemade Cinnamon Rolls

Happy Mother's Day! To all you readers out there, I hope you are celebrating the life or memory of your mother and all that she means to you. And for those of you who are mothers yourself, congratulations for a job well done! Parenting is no joke, or so I hear.

I also hear that Mother's Day brunch is all the rage these days. But if I was in the same state and able to celebrate with my mother in person today, I would probably make something special for her at home, such as these delicious homemade cinnamon rolls I adapted from Alexandra Cooks. Warm from the oven and smothered in a generous amount of cream cheese frosting, I promise you that these are better than Pillsbury. 


Are these quick to make? The answer is not really. But they are not difficult? Definitely not. Like with any homemade bread product, you just need to be patient and let these babies rise for a few hours. So most of the prep time is hands-off, you just need to be puttering around the house somewhere. The great news is that you can even do the prep work the night before, and simply bake them the next morning. That way, even dad/your husband/your kids could pop them in the oven and "surprise" you with a tasty treat!


Ingredients:

Dough:
1 cup whole milk (or ½ cup milk + ½ cup half and half)
3 tablespoons unsalted butter
3 1/2 cups (or more) flour, divided
1/2 cup sugar
1 large egg
2 1/4 teaspoons rapid-rise yeast
1 teaspoon table salt
Nonstick vegetable oil 


Filling:
3/4 cup (packed) brown sugar
2 tablespoons ground cinnamon
1/4 cup (1/2 stick) unsalted butter, room temperature 


Cream Cheese Frosting:
4 ounces cream cheese, room temperature
1 cup powdered sugar
1/4 cup (1/2 stick) unsalted butter, room temperature
1/2 teaspoon vanilla extract


Directions: 

1.     Combine milk and butter in glass measuring cup. Microwave on high until butter melts and mixture is just warmed to 125°F, about 1 minute. It should be warm but not hot. Pour into bowl of stand mixer fitted with paddle attachment.
2.     Add 1 cup flour, sugar, egg, yeast, and salt. Beat on low speed 3 minutes, stopping occasionally to scrape down sides of bowl. Add 2 1/2 cups flour. Beat on low until flour is absorbed and dough is sticky, scraping down sides of bowl. If dough is very sticky, add more flour by tablespoonfuls until dough begins to form ball and pulls away from sides of bowl. Switch to the dough hook and knead dough for 5-6 minutes or until smooth and elastic.
3.     Lightly oil a large bowl with vegetable oil. Transfer dough to bowl, turning to coat. Cover bowl with plastic wrap. Let dough rise in warm draft-free area until doubled in volume, about 2 hours.
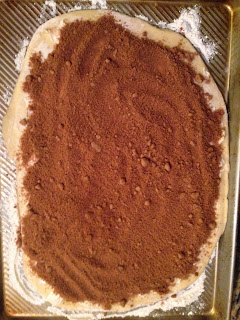
4.     Meanwhile, mix brown sugar and cinnamon in medium bowl. Punch down dough. Transfer to floured work surface (I used a floured baking sheet to keep things from getting messy). Roll out to 15×11-inch rectangle. Spread butter over dough. Sprinkle cinnamon sugar evenly over butter. Starting at 1 long side, roll dough into a long log, pinching gently to keep it rolled up. With seam side down, cut with thin sharp knife into 18 equal slices (each about 1/2 to 3/4 inch wide).
5.     Grease two 9-inch baking dishes (square or round, I preferred round) with vegetable spray, oil, or butter. Divide rolls between baking dishes. Cover with plastic wrap and let the rolls rise in a warm area until almost doubled in volume, 40 to 45 minutes.
6.     Note: If you are baking the rolls tomorrow, place the pans in the fridge at this point. The next morning, remove and from fridge let come to room temp for one hour before baking; also remove butter and cream cheese for frosting at this time so it can begin to soften. 
7.     Preheat oven to 375°F and bake rolls until tops are golden, about 20 minutes. Remove from oven and invert immediately onto rack. Cool 10 minutes. Turn rolls right side up.
8.     For glaze, combine cream cheese, powdered sugar, butter, and vanilla in medium bowl. Using a mixer, beat until smooth. Spread glaze on rolls and serve warm.